Real-Time Digital Clock using Arduino
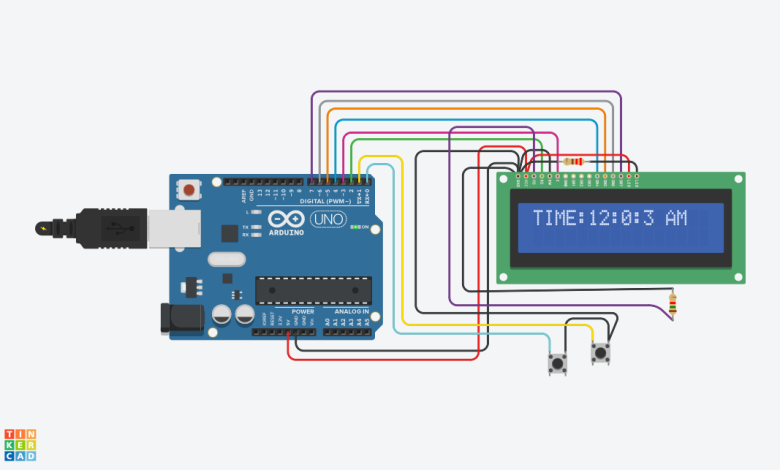
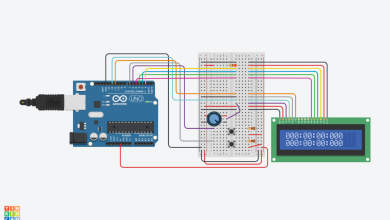
This project presents a real-time clock implemented with an Arduino and push buttons. The system utilises a Liquid Crystal Display (LCD) to showcase the current time in hours, minutes, and seconds.
Two push buttons are employed to adjust the hours and minutes manually. The clock operates on a 12-hour format and distinguishes between AM and PM.
Component List:
| Name | Quantity | Component |
|---|---|---|
| U1 | 1 | Arduino Uno R3 |
| U2 | 1 | LCD 16 x 2 |
| SHour SMin | 2 | Pushbutton |
| R2 | 1 | 1.5 kΩ Resistor |
| R3 | 1 | 0.22 kΩ Resistor |
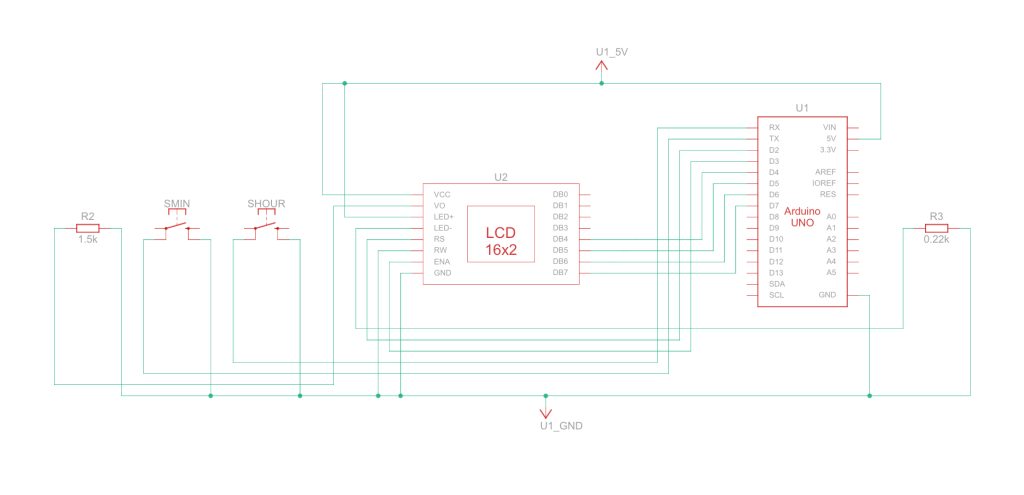
The circuit involves a 16×2 LCD connected to the Arduino through specific pins (rs, en, d4-d7). Push buttons for adjusting hours and minutes are linked to digital pins. The Arduino reads these buttons, updates the time variables, and displays the real-time on the LCD. A pull-up configuration is used for the push buttons.
Arduino code:
#include <LiquidCrystal.h>
const int rs = 2;
const int en = 3;
const int d4 = 4;
const int d5 = 5;
const int d6 = 6;
const int d7 = 7;
LiquidCrystal lcd(rs, en, d4, d5, d6, d7);
int h = 12;
int m = 0;
int s = 0;
int flag = 0;
int TIME = 0;
const int hs = 0;
const int ms = 1;
int state1 = 0;
int state2 = 0;
void setup()
{
lcd.begin(16, 2);
pinMode(hs, INPUT_PULLUP);
pinMode(ms, INPUT_PULLUP);
}
void loop()
{
lcd.setCursor(0, 0);
s = s + 1;
lcd.print("TIME:" );
lcd.print(h);
lcd.print(":");
lcd.print(m);
lcd.print(":");
lcd.print(s);
if (flag < 12) lcd.print(" AM"); if (flag == 12) lcd.print(" PM"); if (flag > 12) lcd.print(" PM");
if (flag == 24) flag = 0;
delay(1000);
lcd.clear();
if (s == 60)
{
s = 0;
m = m + 1;
}
if (m == 60)
{
m = 0;
h = h + 1;
flag = flag + 1;
}
if (h == 13)
{
h = 1;
}
lcd.setCursor(0, 1);
state1 = digitalRead(hs);
if (state1 == 0)
{
h = h + 1;
flag = flag + 1;
if (flag < 12) lcd.print(" AM"); if (flag == 12) lcd.print(" PM"); if (flag > 12) lcd.print(" PM");
if (flag == 24) flag = 0;
if (h == 13) h = 1;
}
state2 = digitalRead(ms);
if (state2 == 0)
{
s = 0;
m = m + 1;
}
}
This real-time digital clock project provides a practical example of interfacing Arduino with input devices and an output display. It serves as a foundation for more complex timekeeping applications.
The simplicity of the circuit makes it accessible for beginners, offering hands-on experience in programming, interfacing hardware, and managing time functions.
This project aligns with the fundamental concepts of embedded systems and can be extended to include additional features like alarm settings or date display.

