Ever wanted a security system that looks straight out of a spy movie but costs less than your weekly coffee budget? This Arduino-based laser tripwire alarm uses a simple laser beam and sensor to detect intruders, triggering a loud buzzer the moment someone crosses the line. Perfect for protecting your garage, backyard fence, garden shed, or even a room door.
It’s beginner-friendly, uses cheap parts, and can be expanded with buzzers, lights, or even SMS alerts. Let’s build it step by step.
How the Laser Tripwire Works
The system has two main parts: a transmitter (laser pointer) that shoots a steady beam, and a receiver (Arduino + light sensor) that watches for that beam.
When the laser hits the sensor (LDR), everything stays quiet – system armed. If someone or something blocks the beam, the sensor detects darkness, and the Arduino sounds the alarm. Simple physics meets smart coding.
You can bounce the laser off mirrors to create zig-zag patterns around doors or windows, covering more area without extra lasers.
Component List:
- Arduino Nano (or Uno)
- LDR (Light Dependent Resistor) light sensor
- Small laser module (toy laser pointer works great)
- Active buzzer module
- Breadboard + jumper wires
- Toggle switch (for arm/disarm)
- 9V battery + clip (or USB power bank)
- Small cardboard or 3D printed mounts
- Hot glue or tape for securing

Build the Laser Transmitter
This is just a standalone laser powered by its own battery:
- Connect one leg of the laser module to the positive battery terminal.
- Wire the other leg through a toggle switch back to battery negative.
- Secure everything with hot glue. Test: flip the switch – red dot appears!
Mount the laser so the beam hits your LDR exactly from 1-5 meters away.
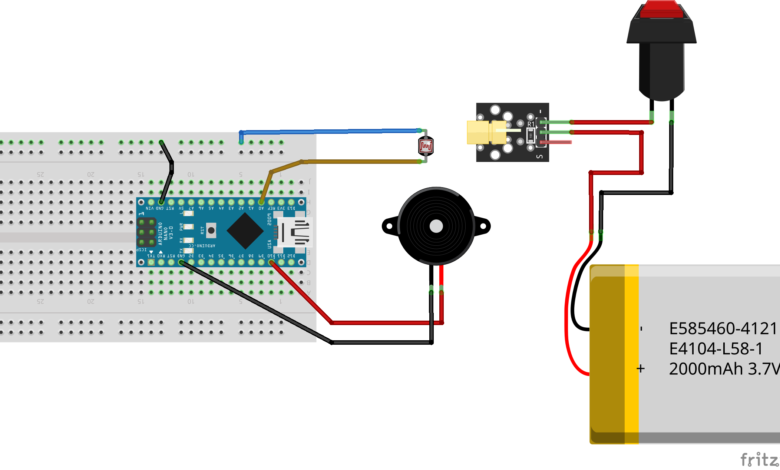
Wire the Arduino Receiver
Grab your breadboard:
- LDR: One leg to Arduino A0, other leg to GND.
- Buzzer: Positive to digital pin 11, negative to GND.
- Toggle switch: One side to 5V, other to digital pin 2 (for arm/disarm).
- Power Arduino via USB or battery.
Double check polarities LDR doesn’t care about direction, but buzzer does!

Arduino Code:
const int ldrPin = A0; // LDR sensor
const int buzzerPin = 11; // Alarm buzzer
const int switchPin = 2; // Arm/disarm switch
const int darkThreshold = 300; // Adjust based on your room light
void setup() {
pinMode(buzzerPin, OUTPUT);
pinMode(switchPin, INPUT_PULLUP);
Serial.begin(9600); // For debugging sensor values
}
void loop() {
int ldrValue = analogRead(ldrPin);
bool systemArmed = !digitalRead(switchPin); // Switch LOW = armed
Serial.print("LDR: ");
Serial.print(ldrValue);
Serial.println(systemArmed ? " (ARMED)" : " (DISARMED)");
if (systemArmed && ldrValue > darkThreshold) {
// Beam blocked! Sound alarm
tone(buzzerPin, 1000, 2000); // 1kHz for 2 seconds
delay(3000); // Pause between alarms
}
delay(100); // Quick loop
}
Calibrate & Install
- Power laser transmitter – aim dot precisely on LDR (use tape to hold position).
- Flip arm switch ON. Serial Monitor shows “ARMED” and steady LDR value.
- Wave hand through beam – buzzer screams!
- Mount permanently: cardboard holders, fence posts, or door frames. Use mirrors for corners!
Pro Tips & Upgrades
- Range boost: Fresnel lens or collimator on laser for 10m+ beams.
- Silent mode: Swap buzzer for vibration motor or LED strobe.
- Smart alerts: Add ESP8266 for email/text notifications.
- Battery life: Sleep Arduino between checks with
Low Powerlibrary. - Weatherproof: Silicone sealant for outdoor use.
Troubleshooting
- No alarm? Check laser hits LDR (Serial Monitor jumps > threshold).
- False alarms? Lower threshold or shield LDR from sunlight.
- Weak laser? Fresh battery in transmitter.
That’s all you need to turn a few basic components into a smart laser security alarm and take your first step into building your own DIY security systems.
Happy Tinkering! — The Tinker Circuits Team