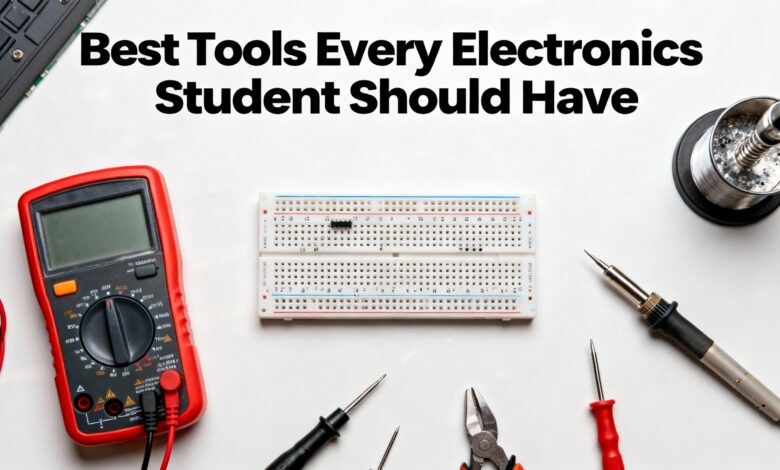
Electronics feels a lot more fun and a lot less frustrating when you have the right tools on your desk. As a student, you don’t need an expensive lab full of fancy gear. What you really need is a small, well-chosen toolkit that lets you build, test, and fix most beginner and intermediate projects comfortably. This guide walks through those “must-have” tools in simple language, with a focus on what you actually use them for in real life.
Multimeter – your everyday diagnostic tool
If you can only buy one tool, make it a digital multimeter (DMM). A multimeter tells you what is really happening in your circuit instead of what you think is happening. You use it to measure voltage, current, resistance, and to check continuity (whether two points are properly connected).
Real uses
- Checking if your battery is actually 9 V or almost dead.
- Making sure your power supply is set to the correct voltage.
- Finding broken connections on a breadboard using the continuity beep.
For a student, a mid-range auto‑ranging multimeter is usually enough. Don’t go for the absolute cheapest model; a slightly better one is more accurate and safer to use for years.
Breadboard and jumper wires – where ideas start
Before you ever design a PCB, you’ll spend a lot of time on breadboards. A solderless breadboard lets you plug in components and wires without any soldering, so you can change your design in seconds.
Why they matter ?
- Perfect for trying out circuits from class or YouTube.
- You can add, remove, or swap components without damaging anything.
- Great for learning microcontrollers, sensors, and simple analog circuits.
Along with the breadboard, keep a box of jumper wires (male–male, male–female, female–female). Pre‑cut jumpers keep your circuits neater and easier to debug.
Basic components kit – your “parts pantry”
Tools are useless if you have nothing to connect. A small organizer with common components saves a lot of time. You don’t need every value, just a practical mix.
Useful to keep on hand
- Resistors (from 100 Ω to 1 MΩ).
- Capacitors (a few ceramic and electrolytic values).
- LEDs with matching current‑limit resistors.
- Push buttons, slide switches, pin headers, small buzzers.
With this, you can follow most beginner tutorials without waiting days for parts to arrive.
Soldering iron and accessories for permanent builds
At some point, breadboards won’t be enough. When you want stronger, permanent connections or to assemble a PCB, you need a soldering iron.
What to look for ?
- Temperature‑controlled soldering iron or station.
- Fine conical or chisel tip.
- Lead‑free solder (0.6–0.8 mm) with flux core.
Also very useful
- Soldering stand and damp sponge or brass wool to clean the tip.
- DE soldering pump or braid to remove mistakes.
- Simple “third hand” or PCB holder to keep the board steady.
Real uses
- Soldering header pins onto modules like sensors or ESP32 boards.
- Fixing loose wires on battery connectors or power jacks.
- Assembling your first custom PCB from your own design.
Hand tools – the unsung heroes
These look boring compared to oscilloscopes, but you’ll reach for them every day.
Essential hand tools
- Side cutters: to trim component leads and cut wires cleanly.
- Wire stripper: to remove insulation without damaging copper.
- Small needle‑nose pliers: to bend leads, hold tiny parts, and pull jumpers.
- Tweezers: especially useful if you ever touch SMD components.
- Precision screwdrivers: for opening enclosures, modules, and laptops.
Together, these make your work neater, safer, and a lot less painful on your fingers.
Power supply – safe and adjustable power
At first you can power circuits from batteries or USB. But as your projects grow, an adjustable DC power supply becomes extremely helpful.
Why it’s worth it ?
- You can dial in exactly 5 V, 9 V, or 12 V as needed.
- Current limiting protects your circuit if you make a wiring mistake.
- You can see how much current your project actually draws, which is great for IoT and battery‑powered designs.
For students on a budget, even a small bench supply or a programmable USB power module can be enough.
Optional but powerful: oscilloscope and logic tools
You don’t have to buy these immediately, but it’s good to know about them as you move from beginner to intermediate level.
- Oscilloscope: lets you “see” voltage changing over time, perfect for debugging sensors, PWM, communication lines, and power problems.
- Logic analyzer: great for checking digital protocols like I²C, SPI, and UART.
- Function generator: can produce test signals to feed into filters and amplifiers.
Many students start by using USB-based or low‑cost scopes, which are fine for learning and hobby projects.
Practical tips for building your toolkit
- Start small: Buy a decent multimeter, breadboard, jumper wires, and a basic component kit first. That alone lets you do a lot.
- Add tools slowly: When you hit a limitation (“I can’t make this permanent,” “I can’t see this signal”), that’s your signal to add a soldering iron, power supply, or maybe an entry‑level scope.
- Spend where it matters: A solid soldering iron and a trustworthy multimeter will last for years and make working with electronics far more enjoyable than ultra‑cheap gear.
This is all about Best Tools Every Electronics Student Should Have, Thanks for reading.
Check out my other articles.