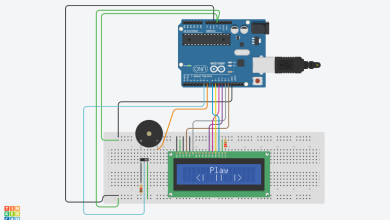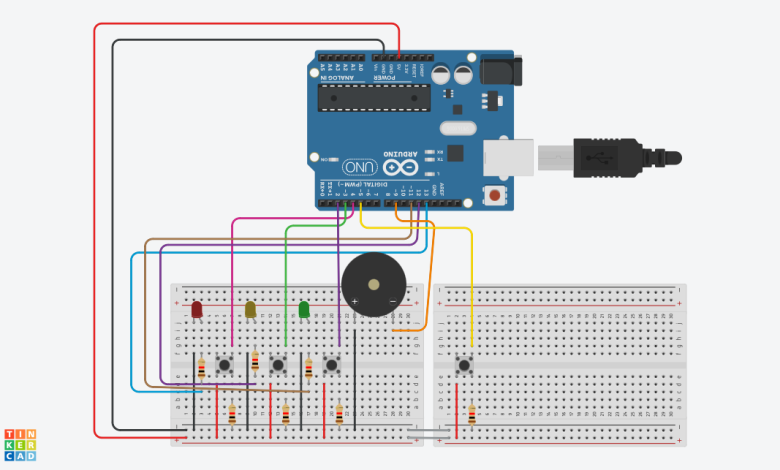
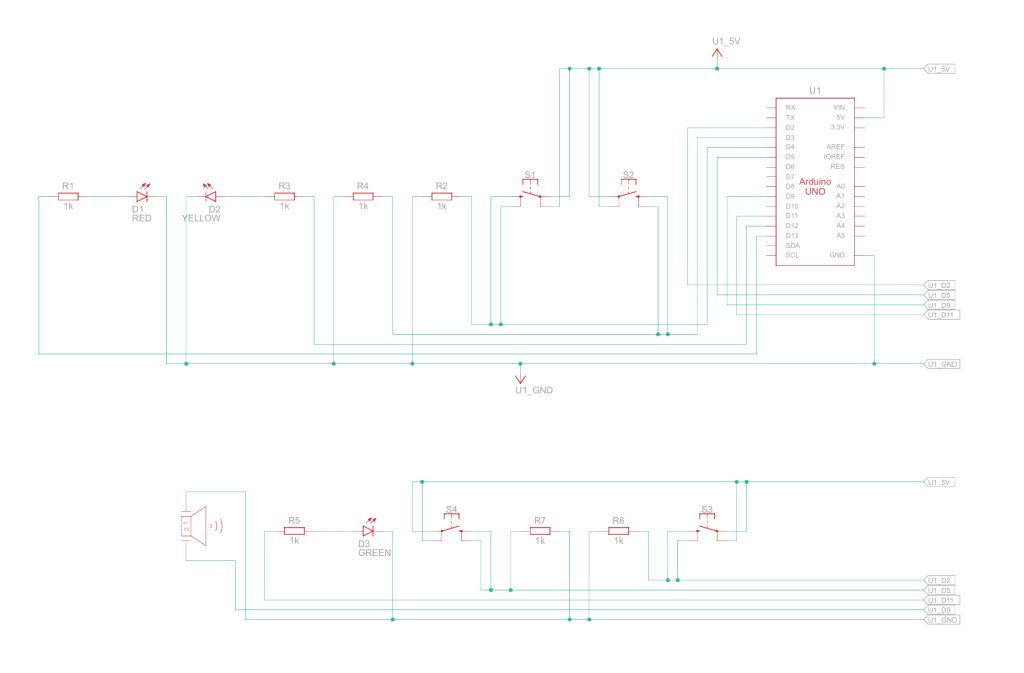
The Arduino Piano Project is a delightful fusion of technology and music, offering an interactive and engaging experience for enthusiasts of all ages. The project utilizes buttons, LEDs, and a buzzer to simulate the piano-playing experience.
Each button corresponds to a unique musical note, triggering an LED and producing a delightful tone when pressed. The addition of a melody sequence adds a playful element, allowing users to enjoy a predefined tune at the press of a button.
This project not only serves as an introduction to basic electronics but also encourages musical exploration and creativity.
The circuit comprises three LEDs (ledpino1, ledpino2, ledpino3), four buttons (botaoA, botaoB, botaoC, botaoD), and a buzzer (som). Each button is connected to a specific note, triggering both an LED and a corresponding tone.
Button D activates a programmed melody. The simplicity of the circuit, with LEDs providing visual feedback, makes it an ideal beginner’s project, blending the joy of music with the excitement of hands-on electronics.
Component List:
| Name | Quantity | Component |
|---|---|---|
| U1 | 1 | Arduino Uno R3 |
| D1 | 1 | Red LED |
| R1 R2 R3 R4 R5 R6 R7 | 7 | 1 kΩ Resistor |
| S1 S2 S3 S4 | 4 | Pushbutton |
| D2 | 1 | Yellow LED |
| D3 | 1 | Green LED |
| PIEZO1 | 1 | Piezo |
Arduino Code:
const int ledpino1 = 13;
const int ledpino2 = 12;
const int ledpino3 = 11;
const int botaoA = 4;
const int botaoB = 3;
const int botaoC = 2;
const int botaoD = 5; // Added button D
const int som = 9;
int estado_botaoA = 0;
int estado_botaoB = 0;
int estado_botaoC = 0;
int estado_botaoD = 0; // Added state for button D
int tom = 0;
// Melody
int melody[] = {262, 196, 196, 220, 196, 0, 247, 262};
int noteDurations[] = {4, 8, 8, 4, 4, 4, 4, 4};
void setup() {
pinMode(ledpino1, OUTPUT);
pinMode(ledpino2, OUTPUT);
pinMode(ledpino3, OUTPUT);
pinMode(som, OUTPUT);
pinMode(botaoA, INPUT);
pinMode(botaoB, INPUT);
pinMode(botaoC, INPUT);
pinMode(botaoD, INPUT); // Added button D
}
void loop() {
estado_botaoA = digitalRead(botaoA);
estado_botaoB = digitalRead(botaoB);
estado_botaoC = digitalRead(botaoC);
estado_botaoD = digitalRead(botaoD); // Added state for button D
if(estado_botaoA && !estado_botaoB && !estado_botaoC) { tom = 500; digitalWrite(ledpino1, HIGH); }
if(estado_botaoB && !estado_botaoA && !estado_botaoC)
{
tom = 1000; digitalWrite(ledpino2, HIGH);
}
if (estado_botaoC && !estado_botaoA && !estado_botaoB)
{ tom = 1500; digitalWrite(ledpino3, HIGH);
 } if(tom > 0) { tone(som, tom); // Play tone on buzzer delay(200); // Wait for 200ms noTone(som); // Stop playing tone tom = 0; // Reset tone to zero digitalWrite(ledpino1, LOW); digitalWrite(ledpino2, LOW); digitalWrite(ledpino3, LOW);
} if (estado_botaoD)
{ // If button D is pressed for (int thisNote = 0; thisNote < sizeof(melody)/sizeof(int); thisNote++)
{ // Play melody int noteDuration = 1000 / noteDurations[thisNote]; tone(som,melody[thisNote],noteDuration);
int pauseBetweenNotes = noteDuration *1.30; delay(pauseBetweenNotes); noTone(som); } }
}
The Arduino Piano Project is a harmonious blend of education and entertainment, allowing individuals to explore the basics of programming, electronics, and music in a single endeavor.
Its simplicity and versatility make it an ideal starting point for creative minds eager to dive into the world of DIY electronics and musical expression.