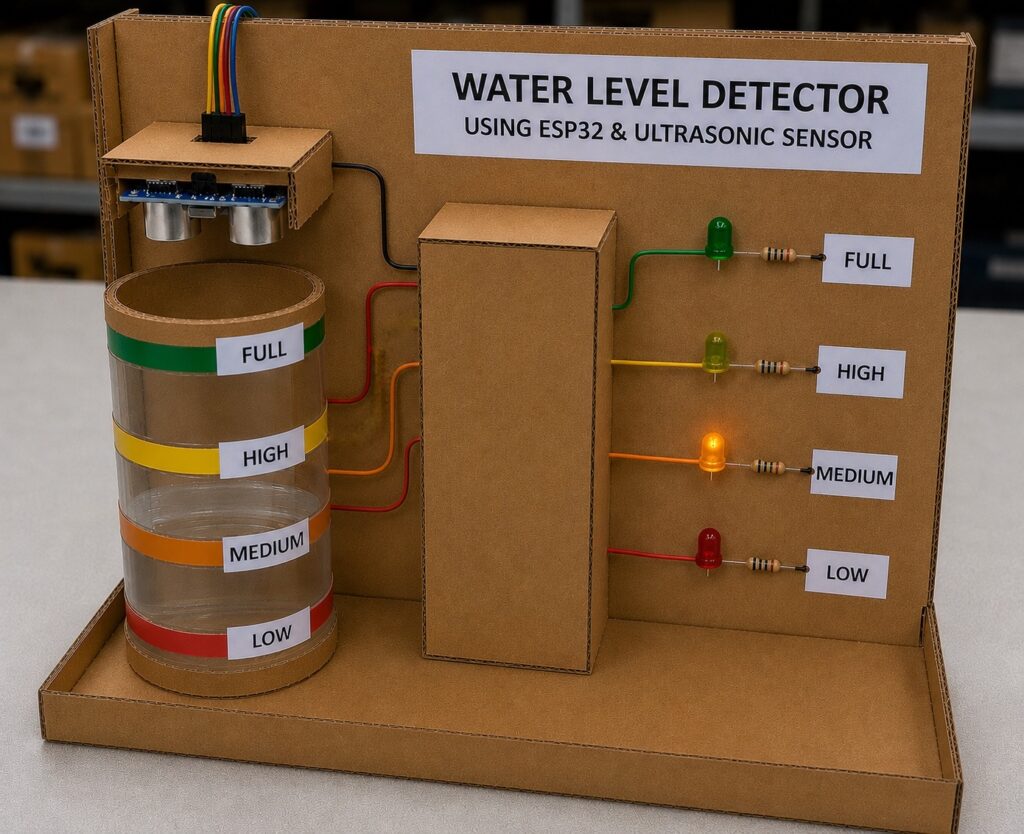
Running out of water in your tank without knowing? Or worried about overflow? In this project, we build a simple yet effective Water Level Detector using an ESP32 and an HC-SR04 ultrasonic sensor. The system measures the distance to the water surface and lights up different coloured LEDs to indicate the water level — Green for low, Yellow for mid-low, Orange for mid-high, and Red for high!
No complex coding, no expensive parts — just a fun and practical project you can build in under an hour!
What You Will Learn :
- How to use the HC-SR04 ultrasonic sensor with ESP32
- How to calculate distance from ultrasonic pulse duration
- How to indicate water levels using 4 coloured LEDs
Components Required :
| Component | Quantity |
|---|---|
| ESP32 Development Board | 1 |
| HC-SR04 Ultrasonic Sensor | 1 |
| Red LED | 1 |
| Orange LED | 1 |
| Yellow LED | 1 |
| Green LED | 1 |
| Resistors (220Ω) | 4 |
| Jumper Wires | Several |
| USB Cable | 1 |
| Computer with Arduino IDE | 1 |
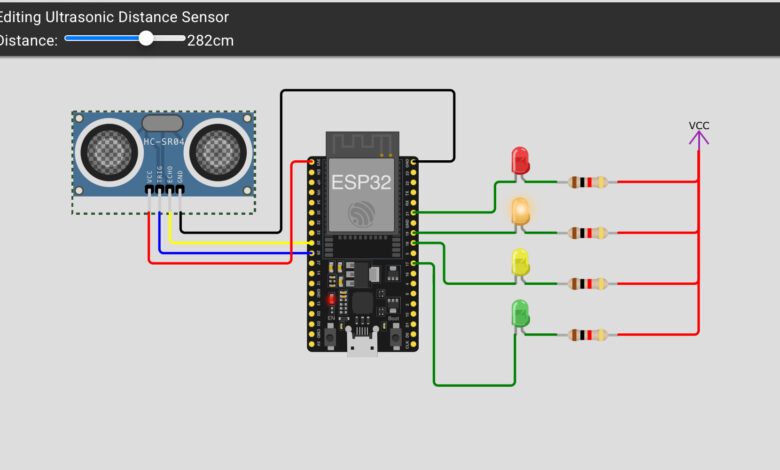
Circuit Diagram :
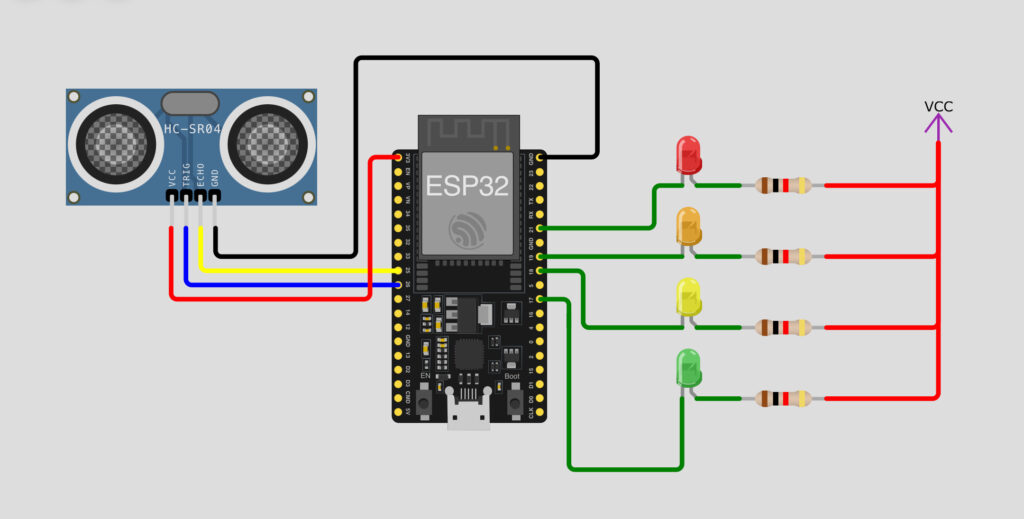
Wiring Table :
HC-SR04 Ultrasonic Sensor → ESP32
| HC-SR04 Pin | ESP32 Pin | Wire Color |
|---|---|---|
| VCC | VCC (5V) | Red |
| GND | GND | Black |
| TRIG | Pin 26 | Yellow |
| ECHO | Pin 25 | Blue |
LEDs → ESP32
| LED Color | ESP32 Pin | Resistor |
|---|---|---|
| Red | Pin 21 | 220Ω |
| Orange | Pin 19 | 220Ω |
| Yellow | Pin 18 | 220Ω |
| Green | Pin 17 | 220Ω |
Important Note: All LED resistors are connected to VCC, making them Active LOW — they turn ON when the pin is LOW and turn OFF when the pin is HIGH. All LED resistors are connected to VCC, making them Active LOW — they turn ON when the pin is LOW and turn OFF when the pin is HIGH. All LED resistors are connected to VCC, making them Active LOW — they turn ON when the pin is LOW and turn OFF when the pin is HIGH.
How It Works :
The HC-SR04 ultrasonic sensor sends out a sound pulse and measures how long it takes to bounce back from the water surface. This time is converted into distance in centimeters. Based on the distance, the ESP32 lights up the corresponding LED:
| Distance (cm) | Water Level | LED |
|---|---|---|
| 0 – 100 cm | Lowest | 🟢 Green ON |
| 101 – 200 cm | Low-Mid | 🟡 Yellow ON |
| 201 – 300 cm | High-Mid | 🟠 Orange ON |
| 301 cm and above | Highest | 🔴 Red ON |
Simulation Video :
Watch the water level detector in action — see how each LED lights up as the distance changes!
Arduino Code :
#define PIN_TRIG 26
#define PIN_ECHO 25
#define GREENLED 17
#define YELLOWLED 18
#define ORANGELED 19
#define REDLED 21
unsigned int level = 0;
void setup() {
pinMode(GREENLED, OUTPUT);
pinMode(YELLOWLED, OUTPUT);
pinMode(ORANGELED, OUTPUT);
pinMode(REDLED, OUTPUT);
digitalWrite(GREENLED, HIGH);
digitalWrite(YELLOWLED, HIGH);
digitalWrite(ORANGELED, HIGH);
digitalWrite(REDLED, HIGH);
pinMode(PIN_TRIG, OUTPUT);
pinMode(PIN_ECHO, INPUT);
}
void loop() {
digitalWrite(PIN_TRIG, HIGH);
delayMicroseconds(10);
digitalWrite(PIN_TRIG, LOW);
int duration = pulseIn(PIN_ECHO, HIGH);
level = duration / 58;
digitalWrite(GREENLED, HIGH);
digitalWrite(YELLOWLED, HIGH);
digitalWrite(ORANGELED, HIGH);
digitalWrite(REDLED, HIGH);
if (level <= 100) { digitalWrite(GREENLED, LOW); } else if (level > 100 && level <= 200) { digitalWrite(YELLOWLED, LOW); } else if (level > 200 && level <= 300) { digitalWrite(ORANGELED, LOW); } else if (level > 300)
{
digitalWrite(REDLED, LOW);
}
delay(1000);
}
Customisation Tips :
- Adjust distance ranges: Change the values 100, 200, 300 to match your actual tank size
- Add a buzzer: Connect a buzzer to a free pin and trigger it when Red LED is ON
- Add a Relay: Connect a relay to automatically turn ON a water pump when needed
- Add WiFi alerts: Use ESP32’s built-in WiFi to send notifications to your phone
- Add an OLED display: Show the exact distance reading on a small screen
This is a very practical project that can be used in real life for home water tanks, aquariums, or any container monitoring.
The best part about using the ESP32 is that you can easily expand this project by adding WiFi alerts, an OLED display, or even a relay to automate a water pump. The possibilities are endless!
Try experimenting with the distance thresholds to match your specific tank size, and share your build with us at Tinkercircuits.com!
Happy Tinkering! — The Tinker Circuits Team