Remember the classic Pong arcade game? Now you can build your own mini version using just an Arduino Nano, an OLED display, two push buttons, and a buzzer! This project recreates the timeless paddle-and-ball game where you compete against the CPU. First one to score 9 points wins!
What You Will Learn :
- How to use an SSD1306 OLED display with Arduino
- How to read push button inputs for game controls
- How to create simple game physics (collision detection, ball movement)
- How to add sound effects using the tone() function
Components Required :
| Component | Quantity |
|---|---|
| Arduino Nano | 1 |
| 0.96” OLED Display (SSD1306, I2C) | 1 |
| Push Buttons | 2 |
| Buzzer | 1 |
| Resistor (220Ω) | 1 |
| Jumper Wires | Several |
| USB Cable | 1 |
| Computer with Arduino IDE | 1 |
Libraries Required :
You will need to install the following libraries in your Arduino IDE:
- Adafruit GFX Library
- Adafruit SSD1306
- SPI (built-in)
- Wire (built-in)
To install: Go to Sketch → Include Library → Manage Libraries and search for Adafruit SSD1306 (this will also prompt you to install Adafruit GFX).
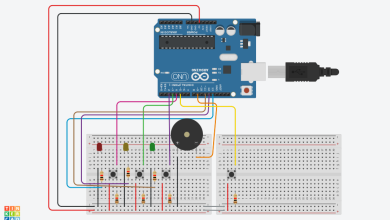
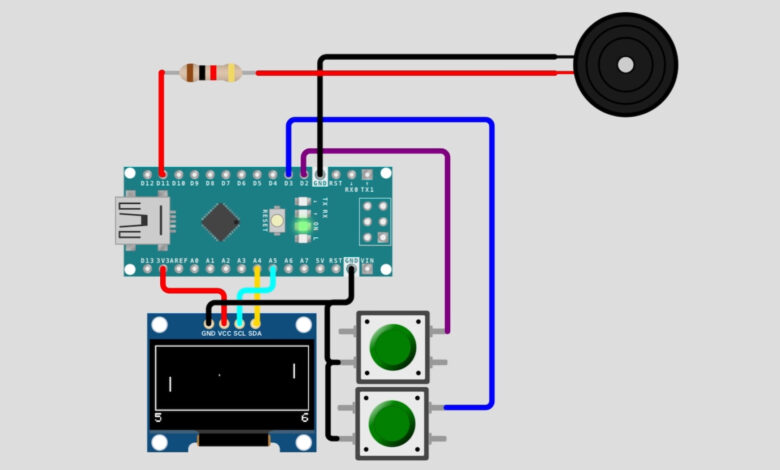
Circuit Diagram :
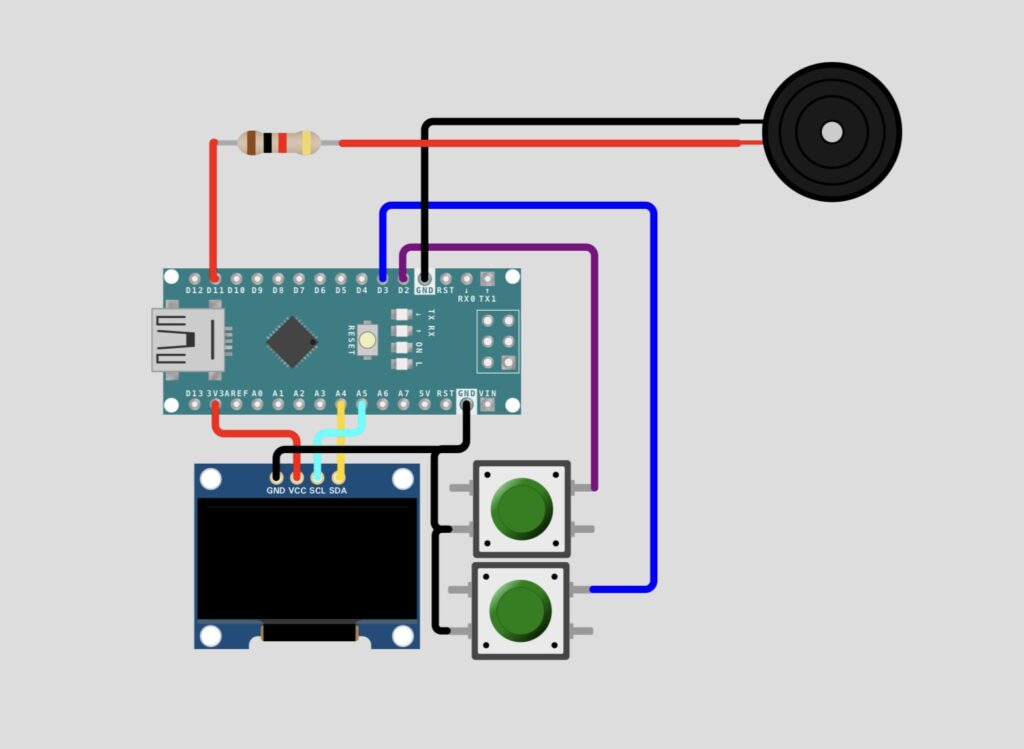
Wiring Table :
OLED Display → Arduino Nano
| OLED Pin | Arduino Pin |
|---|---|
| GND | GND |
| VCC | 3V3 |
| SCL | A5 |
| SDA | A4 |
Buzzer → Arduino Nano
| Buzzer Pin | Arduino Pin |
|---|---|
| + (through resistor) | D11 |
| – | D2 |
Push Buttons → Arduino Nano
| Button | Arduino Pin | Other Pin |
|---|---|---|
| Down Button | D3 | GND |
| Up Button | A6/A7 area | GND |
How It Works :
- The OLED display shows a court (rectangle border) with a ball bouncing between two paddles
- The CPU paddle (left side) moves automatically based on the ball’s position
- The player paddle (right side) is controlled using the Up and Down push buttons
- Each time the ball hits a paddle or wall, a different tone plays through the buzzer
- When a player misses the ball, the opponent scores a point
- The score is displayed at the bottom of the screen
- First to reach 9 points wins, and “YOU WIN!!” or “YOU LOSE!” is displayed before the game resets
Circuit Simulation :
Watch the Pong game in action — see the ball bounce, paddles move, and score update live!
Arduino code :
#include <SPI.h>
#include <Wire.h>
#include <Adafruit_GFX.h>
#include <Adafruit_SSD1306.h>


#define UP_BUTTON 2
#define DOWN_BUTTON 3


const unsigned long PADDLE_RATE = 64;
const unsigned long BALL_RATE = 16;
const uint8_t PADDLE_HEIGHT = 12;
const uint8_t SCORE_LIMIT = 9;


Adafruit_SSD1306 display = Adafruit_SSD1306(128, 64, &Wire);


bool game_over, win;


uint8_t player_score, mcu_score;
uint8_t ball_x = 53, ball_y = 26;
uint8_t ball_dir_x = 1, ball_dir_y = 1;


unsigned long ball_update;
unsigned long paddle_update;


const uint8_t MCU_X = 12;
uint8_t mcu_y = 16;


const uint8_t PLAYER_X = 115;
uint8_t player_y = 16;


void setup()
{
    display.begin(SSD1306_SWITCHCAPVCC, 0x3C);
    display.display();
    unsigned long start = millis();


    pinMode(UP_BUTTON, INPUT_PULLUP);
    pinMode(DOWN_BUTTON, INPUT_PULLUP);


    display.clearDisplay();
    drawCourt();


    while(millis() - start < 2000);


    display.display();


    ball_update = millis();
    paddle_update = ball_update;
}


void loop()
{
    bool update_needed = false;
    unsigned long time = millis();


    static bool up_state = false;
    static bool down_state = false;


    up_state |= (digitalRead(UP_BUTTON) == LOW);
    down_state |= (digitalRead(DOWN_BUTTON) == LOW);


    if(time > ball_update)
    {
        uint8_t new_x = ball_x + ball_dir_x;
        uint8_t new_y = ball_y + ball_dir_y;


        if(new_x == 0 || new_x == 127)
        {
            ball_dir_x = -ball_dir_x;
            new_x += ball_dir_x + ball_dir_x;


            if (new_x < 64)
            {
                player_scoreTone();
                player_score++;
            }
            else
            {
                mcu_scoreTone();
                mcu_score++;
            }


            if (player_score == SCORE_LIMIT || mcu_score == SCORE_LIMIT)
            {
                win = player_score > mcu_score;
                game_over = true;
            }
        }


        if(new_y == 0 || new_y == 53)
        {
            wallTone();
            ball_dir_y = -ball_dir_y;
            new_y += ball_dir_y + ball_dir_y;
        }


        if(new_x == MCU_X && new_y >= mcu_y && new_y <= mcu_y + PADDLE_HEIGHT)
        {
            mcuPaddleTone();
            ball_dir_x = -ball_dir_x;
            new_x += ball_dir_x + ball_dir_x;
        }


        if(new_x == PLAYER_X && new_y >= player_y && new_y <= player_y + PADDLE_HEIGHT)
        {
            playerPaddleTone();
            ball_dir_x = -ball_dir_x;
            new_x += ball_dir_x + ball_dir_x;
        }


        display.drawPixel(ball_x, ball_y, BLACK);
        display.drawPixel(new_x, new_y, WHITE);
        ball_x = new_x;
        ball_y = new_y;


        ball_update += BALL_RATE;


        update_needed = true;
    }


    if(time > paddle_update)
    {
        paddle_update += PADDLE_RATE;


        display.drawFastVLine(MCU_X, mcu_y, PADDLE_HEIGHT, BLACK);
        const uint8_t half_paddle = PADDLE_HEIGHT >> 1;


        if(mcu_y + half_paddle > ball_y)
        {
            int8_t dir = ball_x > MCU_X ? -1 : 1;
            mcu_y += dir;
        }


        if(mcu_y + half_paddle < ball_y)
        {
            int8_t dir = ball_x > MCU_X ? 1 : -1;
            mcu_y += dir;
        }


        if(mcu_y < 1)
        {
            mcu_y = 1;
        }


        if(mcu_y + PADDLE_HEIGHT > 53)
        {
            mcu_y = 53 - PADDLE_HEIGHT;
        }


        display.drawFastVLine(MCU_X, mcu_y, PADDLE_HEIGHT, WHITE);
        display.drawFastVLine(PLAYER_X, player_y, PADDLE_HEIGHT, BLACK);


        if(up_state)
        {
            player_y -= 1;
        }


        if(down_state)
        {
            player_y += 1;
        }


        up_state = down_state = false;


        if(player_y < 1)
        {
            player_y = 1;
        }


        if(player_y + PADDLE_HEIGHT > 53)
        {
            player_y = 53 - PADDLE_HEIGHT;
        }


        display.drawFastVLine(PLAYER_X, player_y, PADDLE_HEIGHT, WHITE);


        update_needed = true;
    }


    if(update_needed)
    {
        if (game_over)
        {
            const char* text = win ? "YOU WIN!!" : "YOU LOSE!";
            display.clearDisplay();
            display.setCursor(40, 28);
            display.print(text);
            display.display();


            delay(5000);


            display.clearDisplay();
            ball_x = 53;
            ball_y = 26;
            ball_dir_x = 1;
            ball_dir_y = 1;
            mcu_y = 16;
            player_y = 16;
            mcu_score = 0;
            player_score = 0;
            game_over = false;
            drawCourt();
        }


        display.setTextColor(WHITE, BLACK);
        display.setCursor(0, 56);
        display.print(mcu_score);
        display.setCursor(122, 56);
        display.print(player_score);
        display.display();
    }
}


void playerPaddleTone()
{
    tone(11, 250, 25);
    delay(25);
    noTone(11);
}


void mcuPaddleTone()
{
    tone(11, 225, 25);
    delay(25);
    noTone(11);
}


void wallTone()
{
    tone(11, 200, 25);
    delay(25);
    noTone(11);
}


void player_scoreTone()
{
    tone(11, 200, 25);
    delay(50);
    noTone(11);
    delay(25);
    tone(11, 250, 25);
    delay(25);
    noTone(11);
}


void mcu_scoreTone()
{
    tone(11, 250, 25);
    delay(25);
    noTone(11);
    delay(25);
    tone(11, 200, 25);
    delay(25);
    noTone(11);
}


void drawCourt()
{
    display.drawRect(0, 0, 128, 54, WHITE);
}
Code Explanation :
- Setup: Initializes the OLED display, sets the buttons as INPUT_PULLUP, draws the court border, and waits 2 seconds before starting.
- Ball Movement: Every 16ms, the ball’s position updates by one pixel in its current direction. The old ball position is erased (BLACK) and the new one is drawn (WHITE).
- Wall & Paddle Collision: The code checks if the ball hits the top/bottom walls, the CPU paddle, or the player paddle, and reverses direction accordingly while playing a tone.
- Scoring: If the ball passes a paddle and reaches the edge of the screen, the opposite player scores a point. The game ends when either player reaches 9 points.
- Paddle Movement: Every 64ms, the CPU paddle automatically follows the ball’s Y position, while the player paddle moves based on button presses.
- Sound Effects: Different tone frequencies are played for paddle hits, wall hits, and scoring, giving the classic arcade feel.
- Game Over: Displays “YOU WIN!!” or “YOU LOSE!” for 5 seconds, then resets all variables and redraws the court for a new game.
How to Use :
- Wire the circuit as shown in the diagram above
- Install the Adafruit GFX and Adafruit SSD1306 libraries in Arduino IDE
- Copy and upload the code to your Arduino Nano
- The splash screen will show, followed by the game court
- Use the Up and Down buttons to move your paddle and try to beat the CPU!
Customisation Tips :
- Change difficulty: Adjust PADDLE_RATE (lower = faster CPU paddle movement)
- Change ball speed: Adjust BALL_RATE (lower = faster ball movement)
- Change score limit: Modify SCORE_LIMIT to make games shorter or longer
- Change paddle size: Modify PADDLE_HEIGHT for easier or harder gameplay
- Add a second player: Replace the CPU logic with a second set of buttons for 2-player mode
You have successfully built a classic Pong game using Arduino and an OLED display! This project is a fantastic way to learn about display graphics, button inputs, collision detection, and sound generation, all wrapped up in a nostalgic arcade game.
Challenge your friends, tweak the difficulty, or even try adding a two-player mode. The possibilities for customisation are endless!
Try it out and share your high score with us at Tinkercircuits.com !
Happy Tinkering! — The Tinker Circuits Team