Want to build a smart clock that automatically syncs with the internet? In this project, we use an ESP32 and a 16×2 I2C LCD display to create a WiFi connected digital clock. The ESP32 connects to WiFi, fetches the accurate time from an NTP (Network Time Protocol) server, and displays the live time, date, and timezone right on the LCD screen, no manual setting required!
What You Will Learn :
- How to connect an I2C LCD display to ESP32
- How to connect ESP32 to WiFi
- How to fetch and display real time clock data using NTP
- How to format and print time/date on an LCD
Components Required :
| Component | Quantity |
|---|---|
| ESP32 Development Board | 1 |
| 16×2 I2C LCD Display | 1 |
| Jumper Wires | 4 |
| USB Cable | 1 |
| Computer with Arduino IDE | 1 |
Libraries Required :
You will need to install the following libraries in your Arduino IDE:
- WiFi.h, built into ESP32 board package
- Wire.h, built into Arduino IDE
- LiquidCrystal_I2C, for controlling the I2C LCD display
To install in Arduino IDE: Go to Sketch → Include Library → Manage Libraries and search for LiquidCrystal I2C.
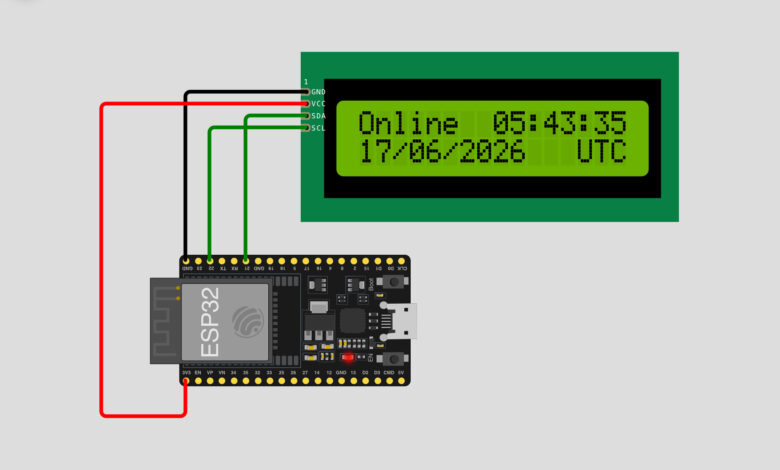
Circuit Diagram :
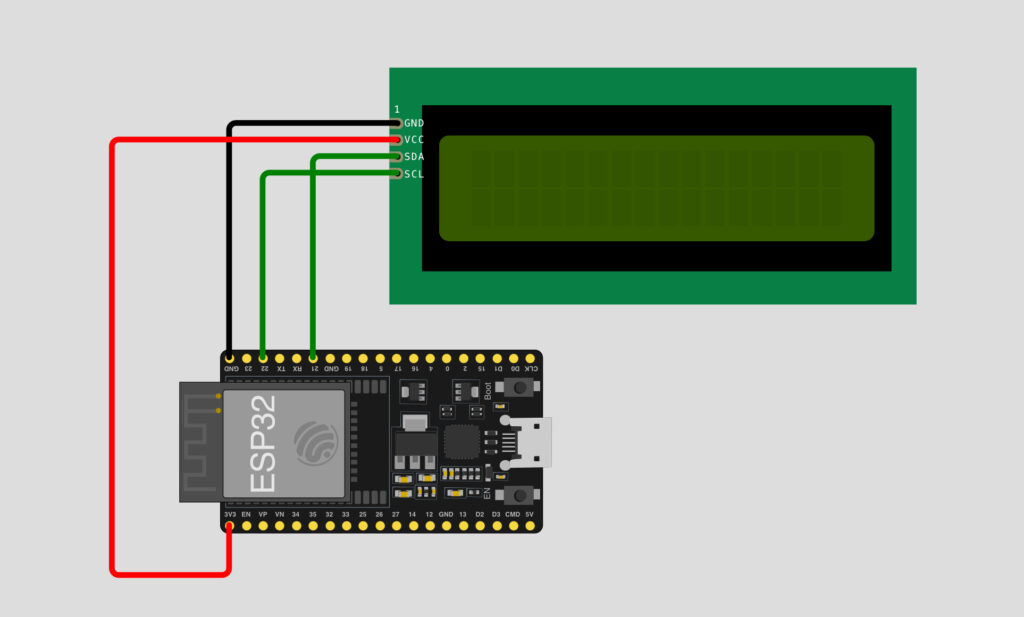
Wiring Table :
| LCD Pin | ESP32 Pin | Wire Color |
|---|---|---|
| GND | GND | Black |
| VCC | 3V3 | Red |
| SDA | Pin 22 | Green |
| SCL | Pin 21 | Green |
Note: This project uses I2C communication, so only 4 wires are needed to connect the LCD!
How It Works :
- The ESP32 connects to a WiFi network using the credentials provided in the code
- While connecting, a spinner animation shows on the LCD
- Once connected, the ESP32 fetches the current time from an NTP server (pool.ntp.org)
- The LCD displays “Online” along with the live time, date, and timezone
- The time updates continuously every 250 milliseconds
Circuit Simulation :
Watch the WiFi clock connect, sync time, and display live updates on the LCD
Arduino Code :
#include <WiFi.h>
#include <Wire.h>
#include <LiquidCrystal_I2C.h>
LiquidCrystal_I2C LCD = LiquidCrystal_I2C(0x27, 16, 2);
define NTP_SERVER "pool.ntp.org"
define UTC_OFFSET 0
define UTC_OFFSET_DST 0
void spinner() {
static int8_t counter = 0;
const char* glyphs = "\xa1\xa5\xdb";
LCD.setCursor(15, 1);
LCD.print(glyphs[counter++]);
if (counter == strlen(glyphs)) {
counter = 0;
}
}
void printLocalTime() {
struct tm timeinfo;
if (!getLocalTime(&timeinfo)) {
LCD.setCursor(0, 1);
LCD.println("Connection Err");
return;
}
LCD.setCursor(8, 0);
LCD.println(&timeinfo, "%H:%M:%S");
LCD.setCursor(0, 1);
LCD.println(&timeinfo, "%d/%m/%Y %Z");
}
void setup() {
Serial.begin(115200);
LCD.init();
LCD.backlight();
LCD.setCursor(0, 0);
LCD.print("Connecting to ");
LCD.setCursor(0, 1);
LCD.print("WiFi ");
WiFi.begin("Wokwi-GUEST", "", 6);
while (WiFi.status() != WL_CONNECTED) {
delay(250);
spinner();
}
Serial.println("");
Serial.println("WiFi connected");
Serial.print("IP address: ");
Serial.println(WiFi.localIP());
LCD.clear();
LCD.setCursor(0, 0);
LCD.println("Online");
LCD.setCursor(0, 1);
LCD.println("Updating time…");
configTime(UTC_OFFSET, UTC_OFFSET_DST, NTP_SERVER);
}
void loop() {
printLocalTime();
delay(250);
}
Code Explanation :
Includes and LCD Setup: The code includes WiFi, Wire (for I2C), and LiquidCrystal_I2C libraries. The LCD object is created with I2C address 0x27 for a 16×2 display.
NTP Settings: NTP_SERVER is set to pool.ntp.org, and UTC offsets are set to 0 (you can change this to match your timezone).
spinner() Function: Displays a rotating animation on the LCD while WiFi is connecting, so the user knows the device is working.
printLocalTime() Function: Fetches the current time using getLocalTime() and prints the time (%H:%M:%S) on the first line and date with timezone (%d/%m/%Y %Z) on the second line.
Setup: Initialises the LCD, connects to WiFi, prints connection status, and configures the time using configTime().
Loop: Continuously calls printLocalTime() every 250 milliseconds to keep the clock updated.
How to Use :
- Wire the circuit as shown in the diagram above
- Install the LiquidCrystal_I2C library in Arduino IDE
- Copy and upload the code to your ESP32
- Open Serial Monitor to confirm WiFi connection and IP address
- Watch the LCD display “Online” along with live time, date, and timezone!
Customisation Tips :
- Change timezone: Update UTC_OFFSET (in seconds) to match your local timezone, for example 19800 for IST (+5:30)
- Enable daylight saving: Set UTC_OFFSET_DST to 3600 if your region observes DST
- Change WiFi credentials: Replace “Wokwi GUEST” with your actual WiFi SSID and password
- Change LCD I2C address: If your LCD doesn’t show anything, try 0x3F instead of 0x27
- Add more info: Display weather, alarms, or reminders alongside the time
This project is a great introduction to working with WiFi, NTP servers, and I2C communication on ESP32. You can take this further by adding alarms, weather updates, or even a small calendar feature.
Try it out and customize it to match your timezone and style. Visit Tinkercircuits.com for more exciting ESP32 projects!
Happy Tinkering! — The Tinker Circuits Team